Create Text Behind Image Effect
The "text behind image" effect has taken social media by storm. You've seen it everywhere - bold text that appears to weave behind your product, creating depth and a professional, eye-catching look. What used to require advanced Photoshop skills and hours of tedious masking can now be done in minutes with prodlens.ai's Canvas Editor.
In this comprehensive guide, you'll learn exactly how to create this trending effect for your product images. Whether you're creating Instagram posts, Facebook ads, or promotional graphics, this technique will make your visuals stand out and drive engagement.
Why the Text Behind Image Effect Works
Before we dive into the tutorial, let's understand why this effect is so effective:
- Creates Visual Depth: The illusion of 3D space makes images more dynamic and engaging
- Draws Attention: The unexpected positioning naturally catches the eye as viewers scroll
- Professional Polish: Elevates simple product shots to marketing-ready graphics
- Versatile Application: Works for e-commerce, social media, ads, and promotional materials
- High Engagement: Posts with this effect consistently see higher engagement rates
The best part? You don't need design experience or expensive software. The Canvas Editor's ML-powered tools make it accessible to everyone.
What You'll Need
To create your text behind image effect, you'll need:
- A product image (generated with prodlens.ai or uploaded from your files)
- 2-3 minutes of your time
- No design experience - the Canvas Editor guides you through each step
That's it. No Photoshop license, no design degree, no complicated tutorials.
Step-by-Step Tutorial
Step 1: Open Your Image in Canvas Editor

First, get your product image into the Canvas Editor:
If you just generated an image:
- After your image generates, you'll see a details panel
- Click the "Edit" button to open it directly in the Canvas Editor
If you have an existing image:
- Navigate to the Canvas Editor from your dashboard
- Upload your product image using the upload button
Once opened, you'll see your image on the canvas with the layers panel on the left showing your image layer.
For best results, use high-quality product images with clear subject definition. The AI background removal works best when there's good contrast between your product and the background.
Step 2: Separate the Product from Background
This is where the magic happens. The Canvas Editor uses AI to intelligently separate your product from its background.
Here's how:
- Select your image layer in the layers panel on the left
- Look for the "Separate Product" button in the properties panel (right sidebar)
- Click the button to start processing
What happens next:
- The AI analyzes your image (typically takes 10-20 seconds)
- Your single image layer splits into two separate layers:
- Subject layer: Your product with a transparent background
- Background layer: Everything that was behind your product
You'll now see both layers listed in your layers panel. This separation is crucial - it's what allows the text to appear behind your product.
The processing time depends on image size and complexity. High-resolution images may take slightly longer, but the results are worth the wait.
Step 3: Add Text Layer
Now that your product is separated, it's time to add the text:
- Look at the toolbar at the top of the Canvas Editor
- Click the "Add Text" button (looks like a "T" icon)
- A text layer appears on your canvas with default placeholder text
The text layer is now active and ready for customization.
Step 4: Edit Your Text
Make the text your own with these customization options:
Edit the Content:
- With the text layer selected, look at the properties panel on the right
- Find the text content textarea at the top
- Type your desired text (product names, taglines, calls-to-action work great)
Customize the Appearance:
- Font: Choose from Google Fonts dropdown - try bold options like Montserrat, Poppins, or Bebas Neue
- Size: Adjust for impact (larger text = more dramatic effect)
- Weight: Bold weights (700-900) create stronger visual presence
- Color: Pick colors that complement your product but contrast with the background
- Alignment: Left, center, or right align based on your composition
- Line Height: Adjust spacing for multi-line text
Bold, thick sans-serif fonts work best for this effect. They create more impact and are easier to read when partially obscured by your product.
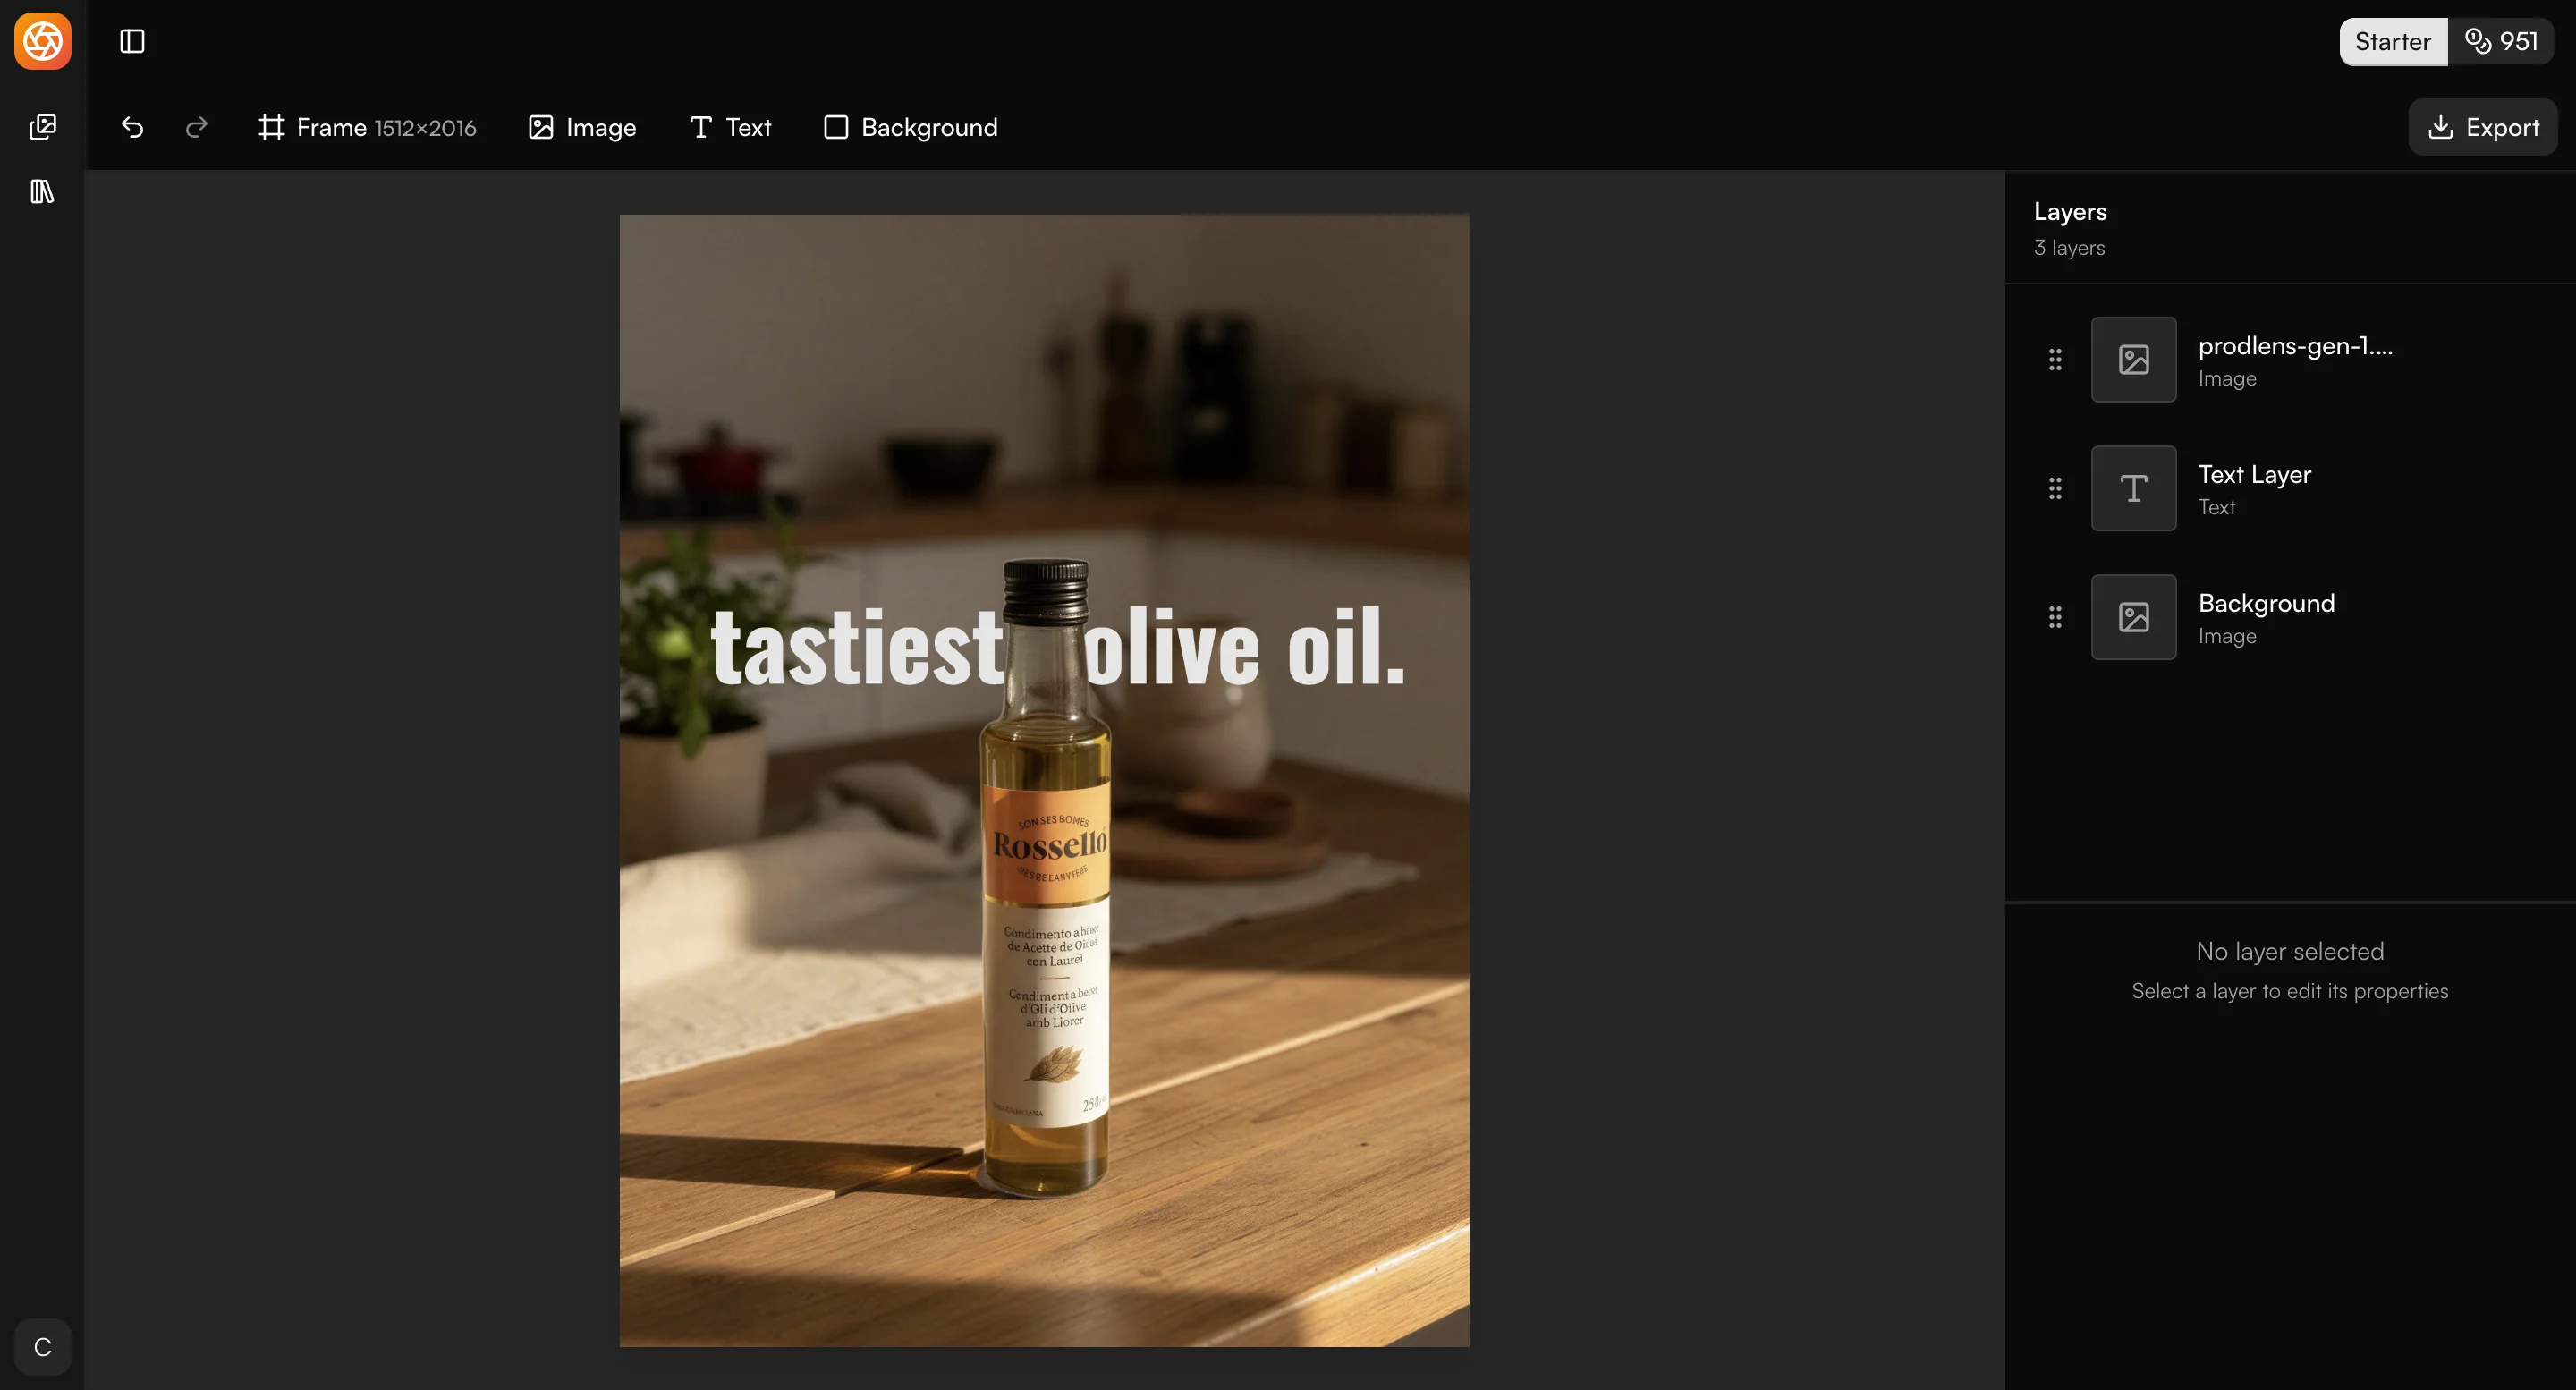
Step 5: Position Text Behind Product
This is the crucial step that creates the "behind" illusion:
Reorder the Layers:
- Open the layers panel on the left side
- You should see three layers: Background (bottom), Text, and Subject (top)
- Drag the text layer so it sits between the background and subject layers
- The correct order from top to bottom should be:
- Subject/Product layer (top)
- Text layer (middle)
- Background layer (bottom)
Position the Text:
- Click and drag the text on the canvas to move it
- Position it so part of the text goes "behind" your product
- Leave some text visible in front for readability
- Use the product's natural shape to guide placement
The text should now appear to weave behind your product, creating that sought-after depth effect.
Imagine your product is standing in front of a wall. The text is painted on that wall. Some text is hidden behind the product, some is visible on either side. That's the effect you're creating.
Step 6: Fine-Tune and Export
Polish your creation with these final adjustments:
Fine-Tuning Options:
- Rotation: Angle the text for dynamic energy (works great for diagonal compositions)
- Position: Make micro-adjustments to perfect the overlap
Export Your Image:
- Click the Export button in the toolbar
- Choose your preferred format:
- PNG: Best for transparency and web use (larger file size)
- JPEG: Smaller files, perfect for social media
- WebP: Modern format with great compression and quality
- Click download
- Your professional text behind image effect is ready to share!
Congratulations! You've just created a professional marketing graphic in under 3 minutes.

Tips for Best Results
Text Placement Strategy
The placement makes or breaks this effect. Follow these guidelines:
- Natural Overlap: Position text so the product naturally obscures part of it (think of how shadows fall)
- Readability Balance: Keep at least 60-70% of the text visible so viewers can read it
- Product Shape: Use your product's contours to guide text flow
- Negative Space: Don't crowd the composition - give elements breathing room
- Rule of Thirds: Position key elements along the rule of thirds grid for visual harmony
Font Selection Guidelines
Your font choice dramatically impacts the final result:
Best Font Types:
- Bold Sans-Serif: Montserrat, Poppins, Roboto - clean and impactful
- Display Fonts: Bebas Neue, Oswald - great for headlines
- Modern Condensed: Barlow Condensed, Fjalla One - space-efficient
Fonts to Avoid:
- Thin weights (hard to read when partially obscured)
- Overly decorative scripts (lose legibility)
- Fonts with fine details (get lost in the effect)
Color Choices That Work
Color creates contrast and draws the eye:
Effective Strategies:
- High Contrast: Dark text on light backgrounds or vice versa
- Complementary Colors: Use colors opposite on the color wheel from your product
- Brand Alignment: Match your brand colors but ensure visibility
- Readability First: If in doubt, go higher contrast - readability trumps aesthetics
Color Combinations to Try:
- White/light gray text on dark backgrounds
- Bold primary colors (red, blue, yellow) on neutral backgrounds
- Gradient text for added dimension
Common Use Cases
The text behind image effect shines in these scenarios:
Instagram Product Posts
- Showcase new arrivals with product names behind the item
- Create carousel posts with consistent text styling
- Highlight features or benefits in a visually engaging way
Facebook & TikTok Ads
- Grab attention in crowded feeds with dynamic text placement
- Communicate offers or discounts with bold typography
- Build brand recognition with consistent text styling
Product Launch Announcements
- Build hype with "Coming Soon" text behind product silhouettes
- Create teaser graphics that intrigue your audience
- Announce limited editions or exclusive drops
Promotional Graphics
- Create sale announcements with pricing text behind products
- Design email headers that stand out in inboxes
- Build social media story templates with your branding
E-commerce Hero Images
- Elevate product page headers with dimensional text
- Create category page banners that guide shoppers
- Design homepage sliders that drive conversions
Frequently Asked Questions
Conclusion
Creating the text behind image effect is no longer reserved for professional designers with expensive software. With prodlens.ai's Canvas Editor, you can create stunning, engagement-driving product graphics in minutes.
Here's what we covered:
- Open your image in the Canvas Editor
- Separate the product from background using ML-powered tools
- Add and customize text with Google Fonts and styling options
- Position text behind product by reordering layers
- Fine-tune and export your professional graphic
The entire process takes 2-3 minutes once you're familiar with the workflow. Compare that to the hours you'd spend in traditional photo editing software, and the time savings become clear.
Key Takeaways:
- Layer order is crucial: Background (bottom), Text (middle), Subject (top)
- Bold fonts work best for maximum impact
- High-contrast colors ensure readability
- AI background removal does the heavy lifting automatically
Ready to create scroll-stopping product images that drive engagement? Try the text behind image effect in the Canvas Editor today. Your products deserve to stand out.
Related Articles